Laser Induced Fluorescence & Raman Scattering
This experiment is currently unavailable.
All pages in this lab. Note To print Full Lab Write-up click on each link below and print separately
I. Laser Induced Fluorescence and Raman Scattering
II. Pre-Labs must be printed separately.LIF Pre-Lab.PRINT, FILL THIS OUT, Get it Signed by 111-Staff, turn in your Signed Pre-Lab Sheet with your report, to the 111-Lab Staff.
All pages in this lab
- Laser Induced Fluorescence and Raman Scattering
- Hologram Development Procedures
- Laser Startup Instructions
- Optics and the Spectrometer
- Troubleshooting
Reprints and other information can be found on the Physics 111 Library Site
Laser Induced Fluorescence and Raman Scattering
Discuss the Physics about this experiment with the faculty or the GSI's in the 111-Lab before starting.
You should keep a laboratory notebook. The notebook should contain a detailed record of everything that was done and how/why it was done, as well as all of the data and analysis, also with plenty of how/why entries. This will aid you when you write your report.
Before The Lab
- Before using the apparatus in this experiment, you must complete training in the safe use of lasers detailed on the Laser Safety Training page. This includes readings, watching a video, taking a quiz, and filling out a form.
View the Laser Induced Fluorescence and Raman Scattering video, discuss pre-lab questions with an instructor, and get the LIF Pre Lab Questions and Staff Sign Off Sheets.....PRINT, FILL THIS OUT, get it signed, and Turn it in with your report.
Prerequisite Reading Materials
- R. W. Wood, Physical Optics. Chapter 5, "The Origin of Spectra" is a historically accurate description of what physicists thought about how spectra were produced. In his time, Wood was the world's foremost experimental physicist in the fields of Light, Optics, and Spectroscopy.
- Lewis, Palmer, and Cruikshank,"Iodine molecular constants from absorption and laser fluorescence", Am. J. Phys. 62, p350 (1994). Read this before you begin the lab, after reading the introductory material in this handout.
- Compaan, Wagoner, and Aydinli, "Rotational Raman scattering in the instructional laboratory," Am. J. Phys. 62, 639 (1994). Read this before the mid-lab exercise (before you do the Raman Scattering section of the lab).
- G. Herzberg, Molecular Spectra and Molecular Structure I. Spectra of diatomic molecules. 2nd ed. D. Van Nostrand Co. Inc. 1950 (QC451.H455 Vol 1 & Vol 2) This is the Bible of diatomic molecular spectroscopy. Vol 1; Read sections of this as necessary; see citations in this write-up and look through contents to decide what to brush up on and QC451.H455 Vol 2 is for Raman and Polyatomic Molecules.
- R. Eisberg and R. Resnick, Quantum Physics of Atoms, Molecules, Solids, Nuclei, and Particles, 2nd ed. (Wiley, New York, 1985), pp. 423-437. This is a straightforward explanation of Raman scattering.
- K.P. Huber and G. Herzberg, Molecular Spectra and Molecular Structure IV. Constants of diatomic molecules. 2nd ed. D. Van Nostrand Co. Inc. 1950. This is a comprehensive tabulation of molecular parameters. Use this to check your results.
- Svanberge, Sune "Atomic and Molecular Spectroscopy"; Chapter 3.1-3.4 & 4.2.2-4.4, pp.29-36 & pp. 50-60. Springer-Verlog (1992).
- Atomic and Molecular Spectroscopy; By Mool Chand Gupta; 2001; New Age International Publishers, New Delhi; ISBN: 81-224-1300-5;
- The Spectra and Structures of Simple Free Radicals an Introduction to Molecular Spectroscopy [[Paste this link into your browser =>]] [[1]]; By G. Herzberg; 1971; ISBN: 0-486-49539-6; Phoenix Edition, Dover Publications, NY
- Introductory Raman Spectroscopy; Introductory Raman Spectroscopy 2Ed. By John R. Farraro, Kazuo Nakamoto, & Chris W. Brown; Academic Press; 2003; ISBN: 0-12-254105-7
Introduction
Molecules in the gaseous state can absorb light when the frequency or photon energy matches the energy difference between two levels. A short time later, the molecules decay to lower energy states and emit photons (fluorescent light) with energies corresponding to energy differences between states. The lower states can be the same as or different from the original state. Observation of frequencies of light absorbed or of these fluorescence photons can tell us about the energy level structure of the molecule.
In addition to absorption, molecules also scatter light no matter what its frequency. Scattered light is often accompanied by weak additional lines close to the scattered lines, whose frequency differences from the exciting lines are the same regardless of the wavelengths of the exciting lines. In this laboratory the techniques of absorption, laser induced fluorescence and scattering are used to study rotational, vibrational, and electronic energy levels of the ground and excited electronic states of diatomic molecular iodine, oxygen, and nitrogen.
Theory
Quantum
The two nuclei in a diatomic molecule are bound together in a potential well which has a minimum at an equilibrium separation, re. (See figure.1) The nuclei are free to vibrate about their equilibrium distance and the vibrational motion is quantized in energy. To first order, the potential is parabolic and the energy levels are those of a simple harmonic oscillator:
where $\omega$ is the angular frequency of oscillation. For two masses on a spring, $\omega=\sqrt{\frac{k}{\mu}}$ where k is the spring constant and $\mu=\frac{m_1m_2}{m_1+m_2}$ is the reduced mass of the system. We will be able to find the effective spring constant for the bond between the two nuclei in diatomic iodine by calculating the angular frequency of oscillation.
However, the potential energy of the diatomic molecule levels-off as the dissociation energy is approached, so that the equilibrium separation goes out to infinity. To account for this, we must add a higher order term to our simple harmonic oscillator model:
where $\sigma$ is a constant, dependent on the particular diatomic gas. Applying perturbation theory, we find that the energies are more precisely represented by:
where $\chi=\frac{15\hbar\sigma^2}{4m^3\omega^4}$. As the energy increases, the spacing between adjacent energy levels decreases (see Fig. 1). In the references for this experiment, a different notation is used. So that you may check your results more readily, you should find the vibrational constants that they define. In their notation, the energy is expressed (in units of $cm^{-1}$) as:
You will find $\omega$ and $\omega_e\chi_e$ for the ground state and for an excited state in iodine. Note: in many sources, you may find $E_v\propto\omega$ and not $\hbar\omega, \hbar\omega c$, etc. In these cases, $\omega$ isn't the frequency think of a diatomic molecule as a rigid rotator (like a spinning barbell). Classically, the kinetic energy of rotation is given by L2/2I, where L is the angular momentum and I is the moment of inertia. In quantum mechanics, you learned that the angular momentum is quantized, $L^2=\hbar^2J(J+1)$ where J = 0,1,2,.... So, the quantum mechanical rotational energy is given by;
where $B\equiv\frac{\hbar^2}{2I}$ is the rotational constant for the gas concerned. For a barbell made from two equal masses,
where M is the mass of each atom and re is the internuclear separation.
| $V(r)=\frac{1}{2}\mu\omega^2(r-r_e)^2$ | $V(r)=\frac{1}{2}\mu\omega^2(r-r_e)^2-\sigma(r-r_e)^3$ |

Figure 1: As energy of vibration increases the spacing between adjacent energy levels decreases
Experimental Procedures
Absorption
In this part of the lab you will study the energy levels of $I_2$ by the method of absorption. Figure 2 shows the transitions that we can observe. They are mostly (Boltzmann distribution) from the ground state to vibrational levels of the upper state. From the energies of the absorption lines we can deduce molecular parameters of the excited electronic state. A wavelength scan of the spectrum without the absorption cell shows the background radiation. As the light passes through the cell some of it is absorbed from the beam, at wavelengths corresponding to transitions between energy levels of the molecule. Absorption shows up as a decrease in the beam radiation, so you should see a series of dips superimposed on the background spectrum.

Figure 2: Absorption in I2

Figure 3: Setup for measuring the I2 absorption spectrum; note that there is no chart recorder but a computer
- Turn on the halogen lamp. Remove the lens and the iodine cell from the light path and position the spectrometer so that the shadow of the track falls symmetrically around the slit casing. It will look like the video or CD.
- Replace the lens and focus the image of the filament on the spectrometer slit. (You should use the two 10 micron slits for this part of the experiment.) The lens should have a focal length of 6 and 7 cm and the lamp filament should be about 6-7cm from the lamp. Then you will see a sharp and enlarged image of the filament on the front of the spectrometer slit. (It will look like a set of vertical lines.) see video or CD.
- Position the iodine cell in the track and make sure that the image is still focused and centered on the spectrometer slit. Adjust the lens if necessary. You may also move the lamp and/or turn its casing to adjust the image.
- Turn on the appropriate photomultiplier tube (PMT). Use a negative High voltage between 800 and 1000.
- There are two programs for this experiment. the first is Voltage vs Time and the second is the Chart Recorder program. Both of these programs use the GPIB interface protocol. The DMM's reading ie; voltage is transmitted to the computer via the GPIB cable to the LabView Program into a strip chart recorder window. Follow the directions on the front panel of the program to run it.
- Turn on the HP 3478A DMM and open the "Voltage vs. Time" program. Set the wavelength on the monochromator to a high point in the range 540 nm to 560 nm and adjust the voltage to the PMT so that you are using the full scale without too much noise. This is to setup the range of the scale you are using. For this part of the experiment, the PMT voltage should be less than -1000 volts and the DMM should be set to autorange.
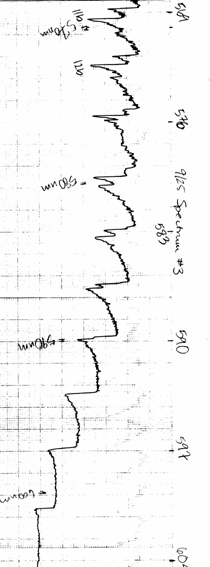
- Make sure that as you turn the wavelength knob on the spectrometer, you see dips and peaks in the spectrum. Close the "Voltage vs. Time" program and open the "Chart Recorder" program. Then, set the wavelength to 490 nm and take a spectrum from 490 nm through 630 nm. You should get something closely resembling the absorption spectrum in the Lewis, Palmer, Cruickshank article. Most importantly, you should begin to distinguish a second series around 543 nm and a third series near 570 nm. (You should see resolved doublets or triplets in these regions--see figure 6) You will need to coordinate starting the data collection with the reading on the spectrometer. The best way to do this is to enter the initial wavelength as 490 nm and start the spectrometer scanning a little below 490 nm. Press start to begin collecting data when the wavelength crosses 490 nm mark. You can verify the calibration of the spectrometer by measuring the spectrum of mercury. Place the mercury lamp directly in front of the spectrometer slit to take its spectrum. The useful spectral lines of mercury are, in nanometers: 491.607, 546.074, 576.960, 579.066. If you are having trouble finding a good spectrum, see the troubleshooting guide for absorption.
- After getting the absorption spectrum, remove the iodine cell and take a spectrum of the background radiation.
Figure 6 Absorption Spectrum

Laser-Induced Fluorescence
In this part of the experiment, you will study the energy levels of the ground state of Iodine by the method of laser induced fluorescence. The output beam of an argon ion laser (wavelength = 514.5 nm) excites a particular vibrational level in an upper electronic state. An iodine molecule in this vibrational level will make a transition to one of the many vibrational levels in the ground state and emit a photon with energy equal to the difference in energy between the two states. There is no selection rule governing transitions from one vibrational state to another; all combinations are possible. Therefore, a collection of iodine molecules all initially in the same excited level will make transitions to many different vibrational states. By monitoring the wavelengths of the emitted photons you can determine the energy spacing of the vibrational levels in the ground state. The goal of this section, in addition to learning the technique of LIF, is to determine as accurately as possible the constants we and wexe for the ground state of $I_2$.
As usual, if you have difficulty getting good data, see the troubleshooting guide in
This experiment involves doing a bit of optics so you may need to brush up on a couple of ideas and learn a little about the spectrometers to get the best possible results. Watch the OPTICS video.
Lenses
A lens is just pieces of glass with curved surfaces such that the directions of incoming rays of light are changed according to Snell's law $n_1\sin{\theta_1}=n_2\sin{\theta2}$ at each surface. For any lens, there is a particular distance for which light from a point source at that distance from the lens becomes collimated (i.e. all rays parallel) upon passing through the lens. This distance is the focal length.
An object is in focus when all rays emerging from any point on the object converge together in a point on the other side of the lens. This occurs for a lens of focal length f when $\frac{1}{o}+\frac{1}{i}=\frac{1}{f}$, where o is the distance from the source (or, object) to the lens and i is the distance from the lens to the image. In other words, if the lens is a distance o from the source, the image will be focused a distance i from the other side of the lens.
The size of the image created is sometimes important. For example, in this experiment, we would like for the image to cover the spectrometer slit. Consider the three rays drawn below between object and image:
By noticing similar triangles, we see that the ratio of the height of the image to the height of the object (i.e. the magnification) is given by: $M\equiv\frac{i}{o}=\frac{h_i}{h_o}$. In a multiple lens system, the total magnification is simply the product of the magnifications for each individual lens involved: $M_{tot}=M_1\times M_2\times M_3\times...\times M_n$.
Spectrometer
In this experiment, you will use a spectrometer to measure the intensity of light as a function of wavelength. The spectrometer used in this experiment consists of multiple mirrors and a reflection grating as shown to the left. The mirrors collimate and refocus the light, and the grating spreads it out like a prism so that only light in a very small range of wavelengths will be focused on the exit slit at one time. When you turn the wavelength knob on top of the spectrometer, the grating turns and focuses a different range of wavelengths on the exit slit.
To get the best signal and the best resolution with the spectrometer, the most important factors are the following:
- The entrance and exit slits must be parallel--this affects mainly the resolution. It should not be a problem but if you are having excessive difficulty getting good results, you may want to check this.
- The full grating should be used. That is, it should be covered with the light. Since you can't see the grating itself, you have to make sure that it is covered by getting a large enough solid angle into the entrance slit. The spectrometer has an f number of 3.5 which means that the ratio of the distance from the final lens to the slit to the diameter of the lens must be less than or equal to 3.5 to make sure that the grating is filled. Basically, this means that your lens should be 15 cm or less from the spectrometer. We get around this in the absorption section of the experiment because the light is very intense.
Analysis
Absorption and Fluorescence Measurements
For the absorption and fluorescence measurements, [[2]] the article by Lewis, Palmer, and Cruickshank will be helpful. The energy of the $\nu$ (lower) vibrational level in the electronic ground state of iodine is given by: $E(\nu)=\hbar c\omega_e[(\nu+\frac{1}{2})-\chi_e(\nu+\frac{1}{2})^2]$
as described above. The energy of the $\nu$ (upper) vibrational level in the excited electronic state is: $E(\nu')=\hbar c\omega_e'[(\nu'+\frac{1}{2})-\chi_e'(\nu'+\frac{1}{2})^2]+T$
where T is the electronic energy of the excited state. The energy associated with a fluorescent transition from the $\nu'$ state to the $\nu$ state is therefore $E(\nu')-E(\nu)=T+\hbar c\omega_e'[(\nu'+\frac{1}{2})-\chi_e'(\nu'+\frac{1}{2})^2]-\hbar c\omega_e[(\nu+\frac{1}{2})-\chi_e(\nu+\frac{1}{2})^2]$
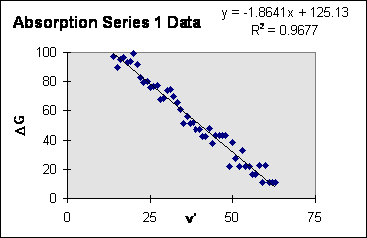
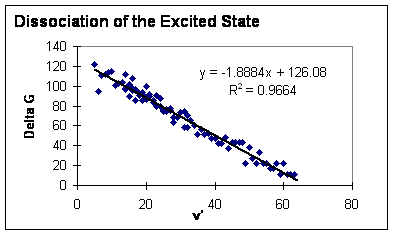
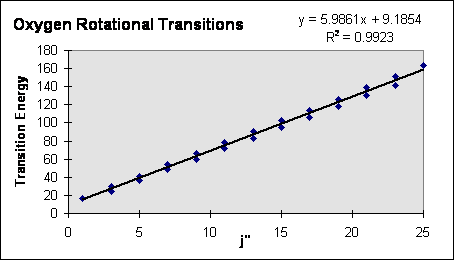
The goal is to determine the constants $\omega_e$ and $\chi_e$ without requiring a knowledge of T, $\omega_e'$ or $\chi_e'$. We eliminate the upper state constants from our analysis by calculating differences in fluorescent transitions. The difference in energy between transitions from $\nu'$ to the lower states $\nu$ and $\nu-1$ is $\triangle G(\nu)=\triangle E(\nu',\nu-1)-\triangle E(\nu',\nu)=\hbar c\omega_e-2\hbar c\omega_e\chi_e\nu$
Notice that $\triangle G$ is a linear function of $\nu$. The slope of $\triangle G$ yields the parameter $\omega_e\chi_e$ and the y-intercept yields $\omega_e$. For the absorption data a similar analysis may be carried out to find the molecular constants, $\omega_e'$ and $\omega_e'\chi_e'$, for the excited state as well as $\omega_e$ and $\omega_e\chi_e$ for the ground state.
A) Tabulate your measurements for absorption and fluorescence as follows:
- Column 1: Transition wavelength
- Column 2: Energy associated with the transition. Express the energy in wavenumber units of cm-1, as is customary in spectroscopy. These units are really $\frac{E}{\hbar c}$, but for our purposes it is a more convenient energy unit than joules or eV's.
- Column 3 and 4: The identity of the lower and upper vibrational levels participating in the transition (i.e. the values of $\nu$ and $\nu'$). Use the laser wavelength as a guide to get you started, remembering that the laser pumps the iodine molecule mostly from the $\nu$= 0 level. Also, use the fact that the 546 nm mercury line is close to the $\nu$=0, $\nu'$=25 transition. (See Lewis, Palmer, and Cruickshank Prerequisite Reading Materials) You will have to use information from the fluorescence and absorption measurements in conjunction here.
- Column 5: The difference in energy between adjacent transitions ($\triangle G$), again expressed in wavenumber units of cm-1.
B) Plot $\triangle G$ vs. $\nu'$ and $\triangle G$ vs. $\nu'$ for absorption and $\triangle G$ vs. $\nu'$ for fluorescence. Use a linear least squares fitting routine to calculate the best values for $\omega_e$ and $\omega_e\chi_e$ for the ground and excited states. Include estimates of error in this fit. You may neglect the uncertainties in your measured wavelengths (although they may be large) and simply include the least square fitting errors. See example below.
C) Find the dissociation energies of the ground state and of the excited state:
- The absorption spectrum converges to a continuum at the short-wavelength end between 490 and 500 nm. It becomes continuous when the molecule dissociates and any excess energy becomes kinetic energy of the atoms which is not quantized. Calculate the energy, Ec, at which the spectrum becomes continuous. This is the energy difference between the vibrational ground state of the molecule with both atoms in the ground state electronic configuration and the sum of the energies of the two atoms each in an excited electronic state. The dissociation energy of the ground state, Do", is the energy difference between the ground state and the sum of the two atomic ground state energies. So, to find Do", we must subtract the atomic energy difference, va (the difference in the energies of the two atoms between the ground states and the excited states) from Ec. (See the figure above left).
- The dissociation energy of the excited state is the energy difference between the ground vibrational state of the excited electronic molecular state and the sum of the energies of the two excited atoms when they are separated. (See figure 11.) You have found the energy separations between successive levels. By extrapolating and summing these energy differences, you can find the total dissociation energy of the excited state. The best way to do this is to plot $\triangle G$ vs. $\nu'$ (Birge-Sponer plot--see Lewis, Palmer, Cruickshank Prerequisite Reading Materials, and figures 3 and 4) for all three absorption series together, then fit a line to the data and integrate over the line from 0 to where it crosses the x axis. See below.
D) Calculate the electronic energy, T, of the B state. (See Fig. 11.) T = Ec - Do'
E) Display your results for absorption and fluorescence in a table like Table I in the article by Lewis, Palmer, and Cruickshank. You can't find the rotational constant B' from your data, so instead include T, the electronic energy of the B state. (Why is their experiment different?)
F) Comment on the intensities of the fluorescence lines. See Herzberg pp. 212-224. (What is the Frank-Condon principle?)[[3]] Franck-Condon principle The generalization that the transition from one energy state of a molecular system to another occurs so nearly instantaneously that the nuclei of the atoms involved can be considered as stationary during the process. The Franck-Condon principle is closely related to the Born-Oppenheimer approximation, in which the various motions (electronic, nuclear vibrations and rotations) are considered to be separable, and in which the electrons respond to the instantaneous vibrations of the system whereas the system responds only to the average position of the electrons. The principle, proposed by J. Franck in 1925 and developed quantum-mechanically by E. U. Condon in 1928, is important in discussing systems of more than one atom. It is therefore valuable in molecular spectroscopy and in the interpretation of the optical properties of liquids and solids. See Molecular Structure and Spectra .
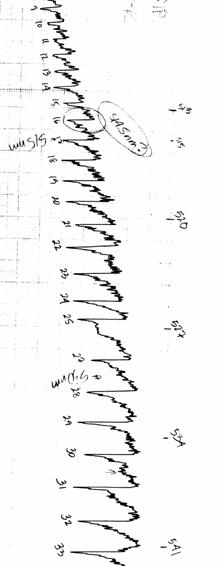
Raman Scattering Measurements
For Raman Scattering, the article by [Compaan, Wagoner, and Aydinli]; ( Am. J. Phys. Vol. 62, No. 7, July 1994) will be helpful.
We saw above that the energy of a rotational state is given by: $E_J=BJ(J+1),J=0,1,2,...$
We also know that the selection rule for Raman scattering transitions between rotational states is $\triangle J=0 or \pm2$
So, the energy of a rotational transition is given by $E_{J+2}-E_J=B[(J+2)(J+3)-J(J+1)]=B[J^2+5J+6-J^2-J]=B(4J+6)$
The transition energy is a linear function of the rotational quantum number J.
A) Make four tables for your Raman scattering results, one for the Stokes lines and one for the anti-Stokes lines of each gas. For each series, include the following:
- Column 1: line wavelength
- Column 2: energy of scattered photons
- Column 3: transition energy--this will be the difference in energy of the scattered photons from the energy of the photons in the laser line.
- Columns 4 and 5: identity of the rotational levels participating in the transition (J' and J")
B) Plot the transition energy as a function of J". (Plot Stokes and anti-Stokes lines for each gas together.) Use a linear least squares fitting routine to find the rotational constant B for each gas. See below.
C) Calculate the internuclear separation for each gas and compare to values in Herzberg volume IV.
D) Comment on the pattern of intensities in the nitrogen spectrum and the spacing of the lines in the oxygen spectrum. Compaan, Wagoner, and Aydinli are especially helpful here. Also, see Herzberg pages 137-144. Also, comment on the shape of the "envelope" of the oxygen line intensities. (How would it change at a higher or lower temperature?)
Please be careful! We want this experiment to be safe and fun. We are relying on you to follow procedures and use good judgment. For instance, before you start, make sure the beam path is free of extraneous objects. Never move objects in or out of the beam while the laser is on. And be mindful whenever you manipulate reflective materials around the laser beam: It only takes one unfortunate reflection to cause a lifetime of damage.
To Turn on the Laser
- Ask a staff member for a pair of Laser Vision protection goggles. You must wear goggles while the laser beam is on.
- DO NOT TURN WATER ON FIRST !!! First PUSH and hold the water interlock box BUTTON while turning on the main water valve, located in the back left corner of the apparatus bench, turn main water valve CCW 90 degrees. The valve to the blue tank should be on with a Leave On sign labeled. Water should be flowing through the laser and out to the sink (located near the East wall in front of you as you face the laser). Make sure the water is flowing into the sink.
- Turn on switch
#28
in the circuit breaker panel. This panel is located on the wall between the Rooms 286A and 286B inside room 286.(to the right of the laser). Steps 4-11 refer to controls on the Spectra-Physics 265 Exciter Laser Power Supply located under the laser:
Safety Goggles on then Turn on the Laser
- Now check for stray beams: Everyday you turn on the laser, you should perform a survey of the Lasers beam paths to check if there are any stray beams (diffuse or specular) emanting from any part of the laser and its optics, and then document this in the Laser Log Book in wall pocket.
- The survey is done by using a white piece of paper. With your goggles on, follow all of the beam paths from the laser to each of the cell samples through to the monochrometers. The beam should go through mirrors and NOT hit or reflect off of anything else on the Optical Table. You may need to move yourself around to view the beams. This Laser beam is hazardous to your eye if un-protected .
- Set the Meter Function switch to the 50 amp position.
- Set the Current Control to about mid-range (around 5).
- Set the Mode switch (to the right of the current control knob) to the left.
- Set the field control knob to 5 for, ten (10) minutes, then to its maximum value (full clockwise).
- Check that the "Water On" light and the three "Line" lights are on.
- Switch on the line switch.
- Wait 30 seconds for "Ready" light to be on.
- Press the "Start" button. There should be an output beam from the laser and the "Ready" light should be off.
- The output power of the laser can be tuned by adjusting the current knob on the power supply. You need at least 1 W of power to do the experiment (as measured on the front panel of the laser power supply meter). NOTE: the laser puts out ~ 1.2 watts of 514.5nm power. If you cannot attain that power level, see the staff.
- Run the Laser for stable output power for 30 minutes before starting to user the laser.
Note: During calibration or any time that the laser is not in use, turn it off by flipping the "line" switch down. Turn it back on using steps 4 through 12.
To turn off the laser when you are done for the day
- Turn off the 'line' switch on the laser power supply.
- Turn off breaker \#28 in the circuit breaker panel.
- Note You MUST turn off the main water IN-valve, CW 90 degrees, and then you can go home. The water will continue to run untill the Laser has cooled off. No overnight runs on this experiment. The water must be kept flowing until both inlet and outlet water pipes are the same temperature.
Gas Handling Procedures
Only adjust the gas if you have been trained to use these procedures by a staff member!
You will be releasing pure oxygen through the relief-valve, this is a volatile gas, please be sure that there are no open flames or smoldering embers nearby before you begin (Obviously this prohibits cigarette smoking).
The procedures reference 'Tank-Valves' and 'Outlet-Valve' refer to the "Gas Flow Diagram" near the rear of this write-up.
- Close both tank-valves and outlet-valves.
- Open the cell relief-valve. The pressurized contents of the cell should begin venting through the relief valve with a gentle hiss about 5 seconds in duration. Leave the relief-valve open.
- On the tank of the gas with which you wish to fill the cell . . .
- Open the tank-valve and
- Open the outlet-valve
- Allow the system to flush for 5 to 10 seconds.
- Close the relief-valve
- The cell should pressurize to about . . .
- 55 ± 5 PSI for O2
- 110 ± 10 PSI for N2
- If it does not, do not attempt to adjust the pressure. Instead, ask for assistance.
- Close the tank-valve and the outlet-valve.
Gas Flow Diagram
Troubleshooting
Absorption
First of all
Are you getting anything at all? Put your hand in front of the slit to block the light and see if this makes any difference. Try this while using the HP3478A Voltage vs Time program If not, then most likely something is either turned off or disconnected. Check all your power switches and connections.
Note: just because the power supply to the PMT is turned on does not mean that it is outputting the power that you have set. Check the display to make sure it is actually working. You must switch on BOTH switches on the front panel.
Lamp/Optics
- Is the filament of the lamp focused on the spectrometer slit or reasonably close to it? It should be simple to do this by placing one 6 cm focal length lens between the lamp and the iodine tube.
- Are the spectrometer slits, iodine tube, lamp, and lens all approximately the same height from the table?
The Photomultiplier Tube
- Is the same tube connected to the power supply that is on, the spectrometer, and the strip chart recorder?
- Try turning up the voltage to the PMT. It should be somewhere between negative 800 and 1300 volts to get a good spectrum.
- = STOP = The staff Will Do This for You! Make sure that the tube is secure in its case; if the core of the tube is facing the wrong direction, you will not get enough signal! See DON or Professor to remove the tube from the back of the spectrometer and look through the window. You should see a bunch of thin, curved pieces of metal. If you don't, it may be facing the wrong direction. Loosen the screw at the edge of the case and turn it until you see these curves of metal. Then tighten the screw to secure it. (Check everything else before you remove the PMT from the back of the spectrometer because doing so may misalign the spectrometer slits!!)
The Spectrometer
- Is the spectrometer set to "high blaze"? And, is it set in the visible region? The highest signal should be observed around 530-550 nm. If you are not getting a signal, search in this region.
- Are the slits (entrance and exit) aligned? Both slits should be horizontal--that is, parallel to the table. If the slits are misaligned, you will have bad resolution but you should still see some signal. If you think that this is the problem that you have, ask for help aligning the slits with the HeNe laser.
- Are the entrance and exit slits the same size? (10 microns is good for absorption.) Again, this would give you resolution problems but would not ruin your signal altogether.
Fluorescence
Laser/Optics
- Is the laser on and reaching at least 0.8 Watts power?
- Is the laser beam passing through the iodine cell? You should be able to see a green line through the window in the cell.
- Is the window in the cell facing the spectrometer?
- Is the laser line focused on the spectrometer slit? You should be able to see a bright green line in good focus either with a piece of white paper in front of the slit or on the slit with white paper taped inside of it.
- Are the spectrometer slits, iodine tube, and lens all approximately the same height from the table?
The Photomultiplier Tube
- Is the same tube connected to the power supply that is on, the spectrometer, and the strip chart recorder?
- Make sure that the High Voltage is NEGATIVE.
- Try turning up the voltage to the PMT.
- Make sure that the PMT is secure in its case (See Absorption Section.)
The Spectrometer
- Is the spectrometer set to "high blaze"? And, is it set near the laser line? You will have to turn the wavelength knob to find the laser line because the monochromator is not perfectly calibrated. Scan through a few nanometers on each side of 514.5 nm.
- Are the slits (entrance and exit) aligned? Both slits should be horizontal--that is, parallel to the table. If the slits are misaligned, you will have bad resolution but you should still see some signal. If you think that this is the problem that you have, ask for help aligning the slits with the HeNe laser.
- Are the entrance and exit slits the same size? (50 microns is good for fluorescence.) Again, this would give you resolution problems but would not ruin your signal altogether.
Raman Scattering
Laser/Optics
- Is the laser on and reaching at least 1.0 Watt power?
- Is the laser beam passing through the Raman cell? You should be able to see a green line through the window in the cell.
- Is the laser line focused on the spectrometer slit? You should be able to see a faint green line in good focus either with a piece of white paper in front of the slit or on the slit with white paper taped inside of it if you cover the whole apparatus with the wooden shields and black cloth.
- Are the spectrometer slits, laser line, and lenses all approximately the same height from the table?
- Are the slits, Raman cell, and lenses all centered on the optical axis? Use a meter stick to align their centers side-to-side. Also, make sure that the optical axis is perpendicular to the Raman cell axis for the best signal. The spectrometer should be about 9.5 cm from the edge of the optical bench. (Match up line drawn on the front of the spectrometer to one drawn on the optical bench.)
- Are the lenses approximately 10 cm from the Raman cell and the spectrometer slit respectively? Are the flat sides of the lenses facing the Raman cell and the spectrometer respectively?
- Try covering the sides of the Raman cell window with black tape. You could be getting lots of laser light scattered off of metal surfaces which can also change its wavelength. If this is happening, the laser line will spread out and hide the Raman lines.
The Photomultiplier Tube
- Is the same tube connected to the power supply that is on, the spectrometer, and the strip chart recorder?
- Try turning up the voltage to the PMT. It should be around 1100 V. If it gets much above 1200 V, you will get too much noise to distinguish the lines.
- Make sure that the PMT is secure in its case (See Absorption Section)
The Spectrometer
- Is the spectrometer set to "low blaze"? And, is it set near the laser line? You will have to turn the wavelength knob to find the laser line because the monochromator is not perfectly calibrated. Scan through a few nanometers on each side of 514.5 nm.
- Are the slits (entrance and exit) aligned? Both slits should be horizontal--that is, parallel to the table. If the slits are misaligned, you will have bad resolution. The laser line will spread out and hide the Raman lines. If you think that this is the problem that you have, ask for help aligning the slits with the HeNe laser.
- Are the entrance and exit slits the same size? (50 microns is good for Raman scattering.) This would give you resolution problems, which is crucial in Raman scattering.
Sign and turn this into the 111-Lab Staff and complete your laser Quiz